[iOS] UITableView 사용해보기 - 2 (didSelectRowAt with Selection)
https://plcprogrammer-dy.tistory.com/84
[iOS] UITableView (테이블뷰) 사용해보기
UITableView에 대한 여러가지 글들을 쓰고싶었는데, 항상 마음 속 발목을 잡은 것은 UITableView에 대한 글의 시작이었습니다. 더 이상 미루면 안되겠다 느껴 바로 시작 ..! Xcode 14.1 Swift 5.7 Storyboard 오늘
plcprogrammer-dy.tistory.com
UITableView를 사용해보지않은 분들은 👆 위에 글 읽고 오시면 좋습니다 !
Xcode 14.1
Swift 5.7
Storyboard + Code
안녕하세요 ~ Rx입니다 🤗

저번 포스팅에서는 tableView를 표시하기 위한 필수적인 datasource 및 delegate 구현을 해보았습니다.
오늘은 UITableViewDelegate의 메소드인 tableView(_:didSelectRowAt:), tableView(_:didDeSelectRowAt:) 에 대해서
그리고 선택되는 영역 Selection을 같이 포스팅할려고합니다 !
오늘의 구현 예제

초기 설정 없이 UITableView 사용해보기 - 1 에서 만든 프로젝트를 그대로 사용하겠습니다 !

스토리보드에서 Selection에 대해서 간단하게 확인해볼 수 있는데요
Selection은 No, Single, Multiple 3가지로 이루어져있어요 !
Seletion은 UITableViewDelegate의 didSelectRowAt, didDeselectRowAt 과 관련이 있어요 !
사용자가가 셀의 선택(Selection)을 바꿨을 때 호출 되는 메소드이기 때문이죠 ㅎㅎ
그럼 Selection 속성에 대해, 같이 하나씩 파고들어가보아요 !
No Selection
스토리보드에서는 이렇게 설정가능합니다. !
제가 No Selection의 오해와 겪었던 경험은 cell Selection Color 설정 할 때 마지막에 같이 얘기해볼까해요 !

코드로는 allowSelection 멤버변수 통해서 설정가능해요 !
allowSelection의 default value는 YES(true)라고하니 Selection을 사용하지않기 위해서는 꼭 NO(false)로 설정해야합니다

override func viewDidLoad() {
    super.viewDidLoad()

    // STEP 1: Single Selection
    tableView.allowsSelection = false
}
Single Selection
Single Selection은 방금 No Selection 했던 것과 같이 선택할 수 있어요

위에 코드에서 allowSelection = false 반대로 allowSelection = true 로 바꿔줄게요 !
override func viewDidLoad() {
    super.viewDidLoad()

    // STEP 1: Single Selection
    tableView.allowsSelection = true
}

...

override func tableView(_ tableView: UITableView, didSelectRowAt indexPath: IndexPath) {
    print(#function, "indexPath: \(indexPath.row)")

}

override func tableView(_ tableView: UITableView, didDeselectRowAt indexPath: IndexPath) {
    print(#function, "indexPath: \(indexPath.row)\n")
}
구현 예제와 같이 BTS ~ Rx 순으로 셀의 선택을 바꿔보니, 아래와 같은 결과를 확인해볼 수 있습니다.
이렇게 콘솔창의 print 결과들을 보며 메소드의 실행 순서를 알아볼 수 있네요 !!

UITableView Cell의 선택 색상 없애기 (How to delete Selection color)
근데 그런 경우가 있었어요 !
아 ! 셀 선택할 때 색이 없었으면 좋겠는데 ???
1. No Selection 으로 사용하기
이 방법은 명시적으로 Selection이 없다고하는 방법이기 때문에 didSelectRowAt, didDeselectRowAt 이 호출이 되지않아요 🥲(No Selcetion으로 해두고 왜 호출이 안되냐고 구글링했었던건 비밀...)
2. UITableView Cell의 Selection 속성 바꾸기
UITableView Cell에도 Selection 속성이 있어요 !

스토리보드에서도 가능하다면 ? 코드로도 가능하겠죠 ?!

override func tableView(_ tableView: UITableView, cellForRowAt indexPath: IndexPath) -> UITableViewCell {
    let cell = tableView.dequeueReusableCell(withIdentifier: reuseIdentifier, for: indexPath)

    cell.textLabel?.text = worldClassList[indexPath.row]
    cell.selectionStyle = .none
    // none, blue, gray, default 4가지

    return cell
}
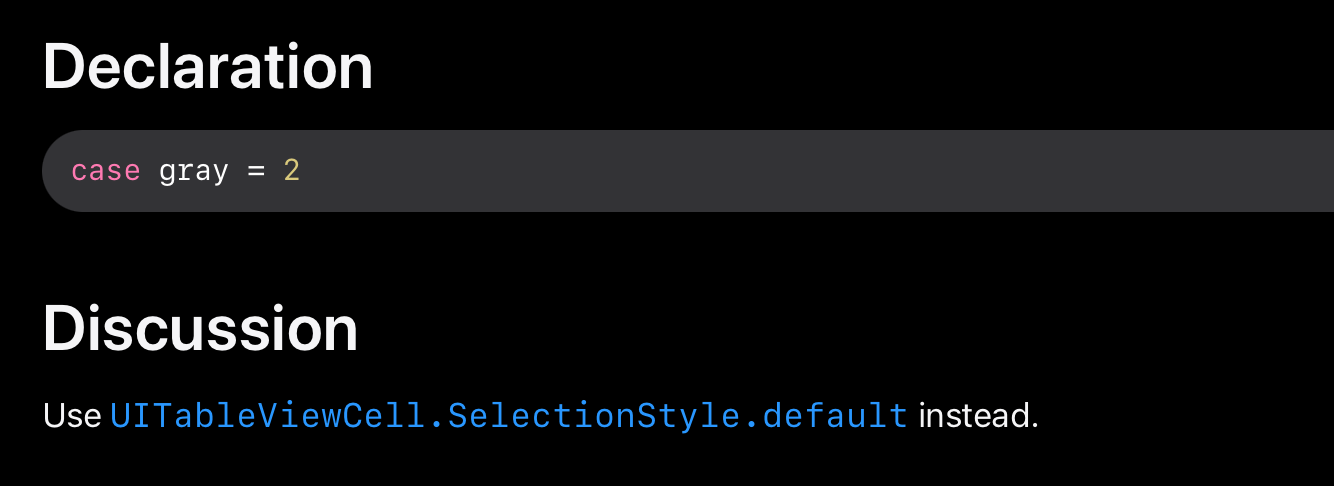
4가지 속성이 있는데 자세히 알아보면 특이점이 있어요
궁금하신 분은 아래 펼쳐보세요 !

blue와 gray의 속성을 자세히 보면 Apple에서 두 값 대신 .default를 사용하기를 권장하고있어요 !
blue가 되지않아서 버그인가 .. 싶어서 문서를 봤는데 이런 설명이 있었네요 !

UITableView Cell 선택 색상 바꾸기 (How to Change UITableView Cell Selection Color)
반대로 셀 선택 색상을 바꾸고 싶은 경우도 있겠죠 ?
UITableViewCell 의 selectedBackgroundView라는 멤버변수를 사용해볼게요 !

class TestTableViewController: UITableViewController {

    let worldClassList: [String] = ["BTS", "손흥민", "봉준호", "Rx"]
    let colorList: [UIColor] = [.systemPink, .lightGray, .cyan, .systemBrown]

...
...

override func tableView(_ tableView: UITableView, cellForRowAt indexPath: IndexPath) -> UITableViewCell {
    let cell = tableView.dequeueReusableCell(withIdentifier: reuseIdentifier, for: indexPath) as! TestCell

    cell.textLabel?.text = worldClassList[indexPath.row]

    // STEP 3: Selection background Color & Animation
    let selectionBackgroundView = UIView()
    selectionBackgroundView.backgroundColor = colorList.randomElement()
    cell.selectedBackgroundView = selectionBackgroundView

    return cell
}

색상이 바뀌었네요 !!
예제와 같이 blink하게 해볼건데요 ! (Multiple Seletion인 경우에는 권장하지않아요 ..! 바로 deselectRow가 호출되거든요 🥲)
아래 코드를 작성해보면 확인 가능합니다 !
didSelectedRowAt이 호출되는 시점에 deselectRow 메소드를 호출하겠습니다 !
override func tableView(_ tableView: UITableView, didSelectRowAt indexPath: IndexPath) {
    print("didSelectedRowAt indexPath: \(indexPath.row)")

    // STEP 3: Selection background Color & Animation
    tableView.deselectRow(at: indexPath, animated: true)
}
Multiple Selection
Single Selection 파트의 코드에서
tableView.allowsMultipleSelection = true 를 추가해볼게요 !
override func viewDidLoad() {
    super.viewDidLoad()

    // STEP 1: Single Selection
    tableView.allowsSelection = true

    // STEP 2: Multiple Selection
    tableView.allowsMultipleSelection = true
}

...

override func tableView(_ tableView: UITableView, didSelectRowAt indexPath: IndexPath) {
    print(#function, "indexPath: \(indexPath.row)")

}

override func tableView(_ tableView: UITableView, didDeselectRowAt indexPath: IndexPath) {
    print(#function, "indexPath: \(indexPath.row)\n")
}
Single Selection과 Multiple Selection의 차이를 사진으로 비교해볼게요.


실습에 사용된 예제소스
참고문헌
https://developer.apple.com/documentation/uikit/uitableviewcell/selectionstyle